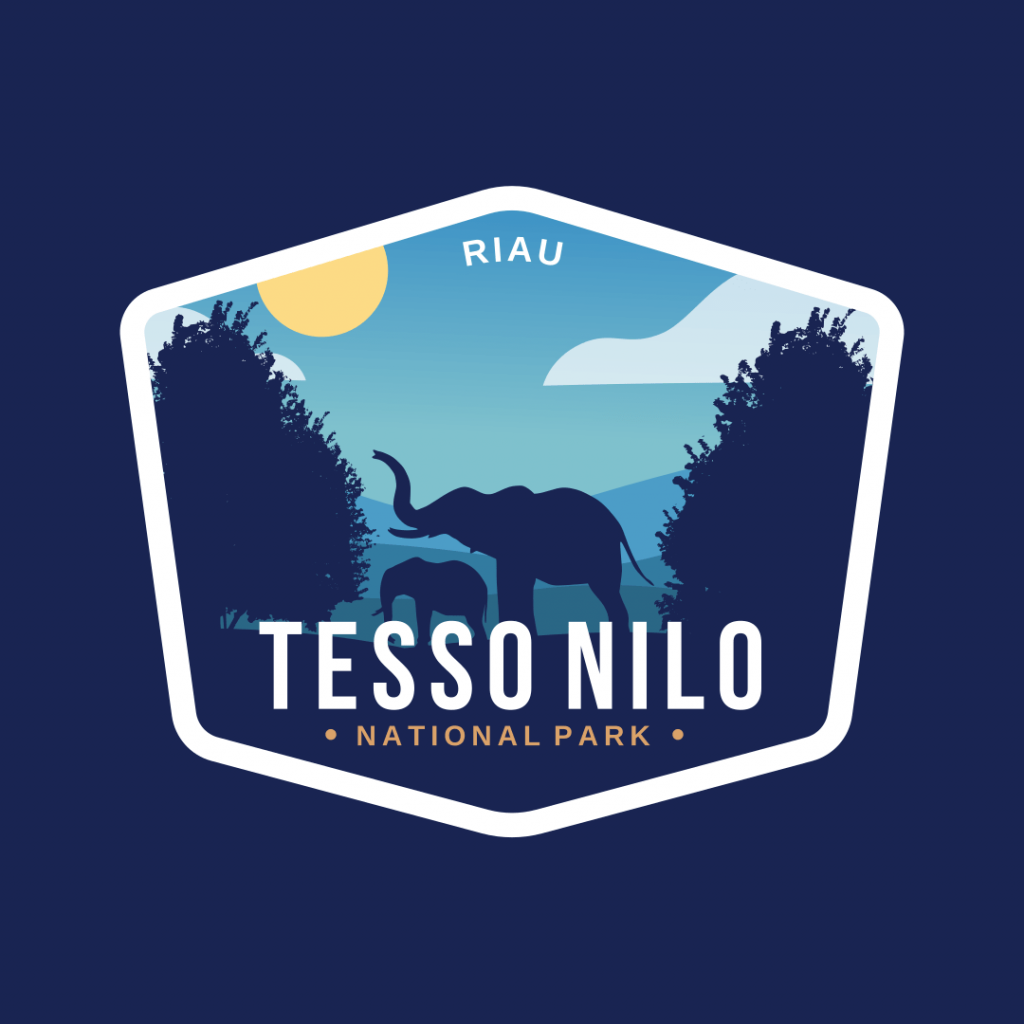
Hi everyone! in this tutorial we are going to create a badge logo design with Inkscape.Tesso Nilo National Park is a national park in Riau Province, Sumatra, Indonesia. Tesso Nilo is one of the lowland habitats for elephant conservation.
What you will learn
- How to create a custom shape
- How to round shape corner with path effect
- How to create a gradient
- How to Tracing Bitmap
- How to add stroke
- How to add text
- How to put text on path
Tutorial Steps
Step 1
Create a shape with Bezier Tool (B) then change the stroke with fill only.
Step 2
Duplicate the shape with the bezier tool press Ctrl+D, then move it to the right.
Flip the shape horizontally by pressing the H button on the keyboard.
Unite the shape in Path > Union
Result:
Step 3
Make the shape rounded with path effects in Path > Path Effects, then add the Corners with a 40px radius. Then convert the object to the path to apply in Path > Object to path.
Step 4
Create a gradient to the shape with the Gradient tool (G) and drag to the shape.
Change the top node color to Green Blue Crayola (#2d87c4ff) and the bottom node to Middle Blue (#7fc1cdff).
Add a background color Space Cadet (#192452ff) with Rectangle tool (R).
Step 5
Duplicate the shape with Ctrl+D, then remove the fill and change the stroke color to white and width to 70px. Don’t forget to send to lower back one step down.
Step 6
Draw a land shape with Bezier Tool (B).
With Dropper tool (D), Change the color to Space Cadet (#192452ff).
Duplicate the shape with gradient press Ctrl+D then make an Intersection in Path > Intersection.
Result:
Add more shapes and do the same methods.
Step 7
Add the tree png in File > Import and choose the tree png. To make it editable, convert it to the Path with trace bitmap in Path> Trace Bitmap, click update, then hit OK.
Press F2 to see the node that means editable; now, you can change the color.
Change the tree color same as the background and place to the badge.
Add more tree variants and do the same methods.
Step 8
Import the elephant png in File > Import and Trace the Bitmap.
Select only one elephant in Path > Break Apart.
select one elephant with full selection then combine the shape in Path > Combine.
Note this “combine” function for intersection the shapes after we break apart. It’s recommended if you do the Bitmap Tracing.
Place the elephants to the badge.
Step 9
Unite the trees by selecting the trees and in Path > Union.
Duplicate the inner badge (the gradient) with Ctrl+D, select the trees and the duplicated shapes, create an Intersection in Path > Intersection.
Result:
And the same thing for the right sides.
Step 10
Draw a cloud shape with the Bezier tool (B).
Change the color to white and send it to the lower back.
Reduce the opacity to 50.
Add more the circle with Jasmine (#fcdb85ff) then do the Intersection for each shapes.
Step 11
The last thing to create the curved text is to draw a round arch shape using the Bezier tool (B). Then type a text with Text tool (T).
Select the shapes and the text, In Text> Put on Path.
And remove the arch shape stroke by right click on the left corner > Remove Stroke.
Bravo, you made it!
Now we can create a custom shape and bitmap tracing in Inkscape with silhouette vector image.
Tutorial Assets
Credits
- Inspired by Alex Aiman – Yellow Stone Redux


