in todays tutorial we’re gonna make some game logo design with inkscape 1.0 using gradient color, font combination and outset to make the outline stroke.
What you will learn
- Moving, Scaling, Rotating, Duplicating Object
- Make a Stroke with Outset
- Make 3 Gradient Color in line
- Create Clipping Mask
- Use Path Effect
Tutorial Steps
Step 1
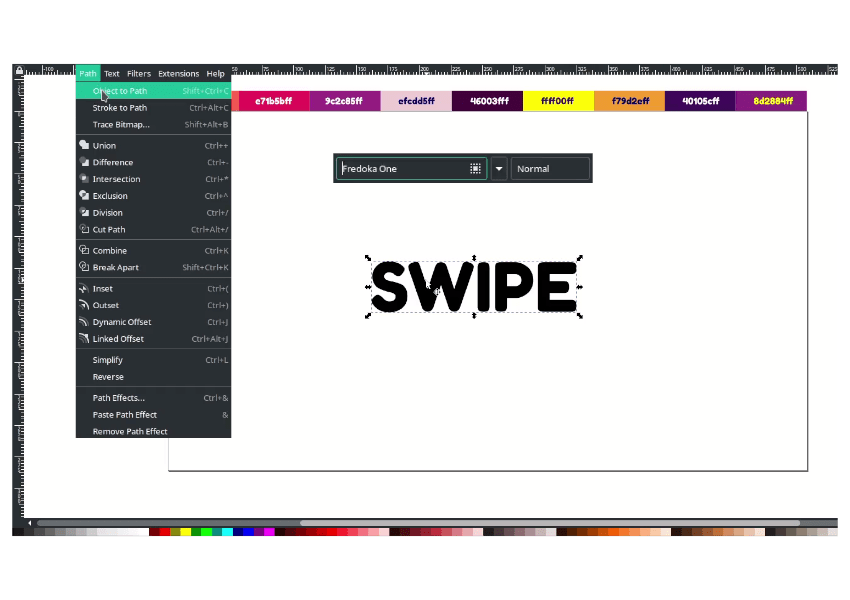
Create a text with the text tool (T), and change the fonts to Fredoka One. Convert it to the Path in Path> Object to Path.

Step 2
Ungroup the text, then scale down and arrange the W, I, P letters.

Unite the text with the union in Path > Union.

Result:

Step 3
Add the path effect in Path > Path Effects > Bend.

Click and drag to up.

Apply the path effect by selecting the text in Path > Object to Path.

Step 4
Add more text and change the fonts to Pacifico.

Get rid of the white gap by selecting the “Bingo” text, then choose Path > Object to Path.

Delete a node for the O letter to clear the straight line by pressing F2 and pressing the DELETE button.

Result:

Step 5
Select the two texts (the “Bingo” and the “Swipe”), then duplicate them with Ctrl+D. And increase the outset by going to Path > Outset.

Press the outset shortcut ( Ctrl+) ) a few times.

Send the duplicate text to the back and change the original text color to white.

Step 6
Fill the white gap with Bezier Tool (B).

Change the color to black (same as the stroke color).

Unite the Path and the stroke by selecting these two objects in Path> Union.

Step 7
To apply the gradient, right-click in the stroke choose to ungroup.

With Gradient Tool (G), drag it down.

Change the gradient color into 3 colors: Bitter Sweet (#fd6352ff), Raspberry (#e71b5ff), Violet Crayola (#9c2c8ff).
Tips: You can add more color by double-clicking between the top and bottom nodes while dragging the gradient.

Step 8
Duplicate the stroke by pressing Ctrl+D.

Send it to the lower back, and change the color to Russian Violet (#46003fff).

And the for the swipe text, duplicate with Ctrl+D then change the color to Queen Pink (#efcdd5ff).

Duplicate once again, then change the color to Russian Violet (#46003fff).

Step 9
Add a background with Rectangle Tool (R), then change the color to Russian Violet (#46003fff).

Create a gradient with Gradient Tool (G), change the gradient color to Russian Violet (#40105cff) and Mardi Grass (#8d2884ff)

Step 10
Create a shape with Bezier tool (B).

And change the color same as the background with Gradient Tool (T).

Create a clipping mask by duplicating the background with Ctrl+D, and select the background and the path, then Right click > Set Clip.

Result:

Step 11
The last thing, add some elements, draw a circle Ellipse Tool (E) and add a gradient color with Lemon Glacier (#ffff00ff) and Yellow Orange (#f79d2eff).

Duplicate, and try to create a dynamic by adjusting the scale.

Add more elements freely as you want, okay?

Congratulations, you made it!
How is it? Easy, right? I hope you learn something new about how to use the gradient, outset stroke, and use path effect in Inkscape. Nnice, Well done!


